Showing posts with label veggies. Show all posts

Our Christmas


The few days after Christmas is always a little bitter-sweet isn't it. You start boxing up your decorations, cleaning out your fridge and reminisce over Christmases past. We just barely cleaned up from Christmas, including vacuuming about ten pounds of dead pine needles. It feels good to have our house back to normal, but there's also a small emptiness it leaves behind.

We had such a lovely Christmas this year. Normally we go back to Idaho to spend it with family, but this year we stayed in Philly and kept things fairly quiet. I was a little homesick, but ultimately it was really nice not to have to travel and we got to establish traditions for our own little family.

Once of those traditions has always been to eat nothing but appetizers on Christmas Eve and watch Christmas movies until we go to bed. It's a lot of fun and adds to the excitement of the upcoming morning.

Since I was too excited to dig in, my pictures are less then blogworthy, but here's what we enjoyed Christmas Eve with the help of some friends...

Mini Caprese Skewers sitting in a layer of pesto, one of my favorite combos of all time!

I tried my hand at another cheese platter this year. Brie, Gouda and a very pungent Stilton made for a very delicious cheese platter, along with fruit and crackers. The Gouda was by far the crowd pleaser. This was actually my first time trying it and it just might be my new favorite cheese.

We also had a veggie tray, green olives, cured meats, a shrimp platter and a french onion dip with potato chips.
Gotta have chocolate chip cookies for Santa, they're his favorite ;)

Homemade baklava brought by our friends. It was so delicious that my husband ate some despite his pecan allergy. He said it was worth it.


Cream puffs, so easy to pop in my mouth, which is exactly what I did.

These were easily the star of the show. Baguette with Brie and caramelized onions. My friend brought these and I ate about four of them. The onions are sweet and the cheese is creamy, making these an almost dessert-like treat. With the extra Brie left in my fridge, I'm pretty sure I know what I'm doing for New Years!

There were also bacon wrapped scallops and water chestnuts, but I'm pretty sure they were eaten too quickly for pictures. And while I think I'm still full a week later from this feast, what are the holidays without good food right? I hope you all had a wonderful holiday season too, enjoy your last two days of 2010!

Roasted Brussel Sprouts


It's amazing how certain recipes just stay with you. I read them, then no matter how much time passes, I just can't rest until making it. That's how it was with this brussel sprouts recipe I found over at The Hungry Housewife (a fun and DELICIOUS blog, I highly recommend you go say hi to Leslie). She posted this recipe clear back in January of last year, but when Thanksgiving rolled around, and I wanted to make brussel sprouts, I knew exactly where to go. Oh I'm so glad I did! There aren't too many brussel sprout lovers in my home, but how can you not automatically love anything cooked in bacon, c'mon? It should win just by default.

These are really simple to make, just a quick saute and a roast. But the results yield a brown, caramelized brussel sprout, brimming with smoky bacon flavor. It was easily the yummiest thing on my plate, and was the only dish that got completely eaten. Oh yes, I will be making these again and again. Thanks Leslie!

Roasted Brussel Sprouts
By The Hungry Housewife

Ingredients

1 pound fresh brussel sprouts,washed and trimmed of the rough "bud" on bottom and halved
Olive Oil
2 large shallots, thinly sliced
6 slices bacon, finely chopped
2 Tbsp Butter
Salt and Pepper
Balsamic Glaze

Directions

Preheat oven to 425

Line a baking sheet with parchment paper.
In a large skillet over medium heat, add bacon and sauté for about 5 minutes. Add the shallots and cook for another 3 minutes. Add Butter , brussels Sprouts, salt and pepper. Toss to coat.

Pour the sprouts onto the baking sheet, roast for 30 minutes, turning once.
Remove from oven and drizzle with the Balsamic Glaze.

After all the pictures I've taken of food, I really shouldn't be surprised!

Gingerbread House Party and Happy Holidays!


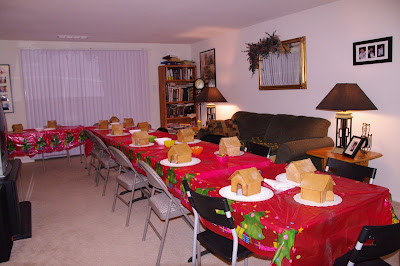
Seeing as this is in fact a Blog About Food, I figured it would be only appropriate to post my gingerbread house party. This is the second one I've done in a row, and I'm really hoping it becomes an annual thing, it's so much fun, especially since the entire thing is involving food!

About a month before the party I make the gingerbread houses, which are the same houses my mom has been making for us our entire lives. They are small and simple, but made out of real gingerbread and are so cute. I freeze them, and then the day before the party, I assemble them with hot glue. It's probably not the most traditional way to assemble them, but it's non-toxic, peels right off, and ensures the fewest broken down houses. I also provided the frosting and piping bags, and then everyone brings a different candy to decorate with.


And here you have the fabulous people that came! You'll notice there are no kids, I think adults should be able to have some good, old fashioned Christmas fun too, don't you! I love these girls. Lots of laughing, eating, and staying up way too late, so fun!

And on to the food.

In the crockpot are Li'l Smokies, dressed in a very complicated sauce of ketchup and mustard. Sounds a bit too simple, but trust me, it's fantastic, and everyone is surprised when they find out that's all it is. There was also a veggie tray with a side of ranch dip (gotta keep the veggies around during the holidays!)

Alissa, from Spunky Girl Eats, brought her fabulous stuffed mushrooms, which disappeared SO quickly. Oh my gosh these were good!

I made Melanie, from My Kitchen Cafe's fantastic cheesecake cookies, bejeweled in a strawberry and blueberry pie filling, how pretty are these, great cookies Melanie!

And of course I had to make cakeballs. I made dark chocolate and mint chocolate cake balls, both made with chocolate cake and chocolate frosting. The mint cakeballs are coated in a mint-chocolate shell using the Wilton candy chips. They were good, but not quite minty enough for me, next time I'm going to put some chopped Andes mints right into the cakeballs.

We had other people bring fantastic treats too, but unfortunately I didn't get pictures of it all. Suffice it to say, there was plenty of food to go around!

I'm so happy with the way things turned out, and I'm already looking forward to doing it again next year. Thank you so much girls for making it a fun night!

And now we're getting ready to board a plane tomorrow to Idaho to spend two blissful weeks with my favorite people in the world. Because of that, I'm probably going to be signing off for the year 2009, it's been a great year hasn't it! So a toast!


My family does an eggnog toast every Christmas Eve, but inevitably they get really silly and by the end of the toast we're all in stitches. Since eggnog is so rich, I can't drink a lot of it, but my friend suggested thinning it out with a bit of Sprite or 7up. It might sound a bit crazy, but it's really delicious and cuts the thickness without losing a lot of flavor. I also love that it's bubbly! So here's to a wonderful holiday and a promising new year! Thank you everyone for all of your support and willingness to read throughout the months, it has made food blogging so very enjoyable. I'll see you all in 2010!
Cheers!

Asian Beef and Noodle Bowl


My interest in food is still pretty new. Back when I was first married my cart was mostly filled with frozen TV dinners, and boxed meals. Every once and a while I would get all romantic and make my man spaghetti, but that was about the extent! And being poor college students (which we still are!), we felt like it was very important that we buy the biggest crate of ramen noodles we could find. I know, bless our hearts! That huge crate sits in our closet still (can it really go bad?) and I maybe pull one out for my kids about once every six months. I can't bring myself to just throw it out, wasting food is such an abomination in my mind, I wouldn't be able to sleep for days!

So, I was pretty happy to find this recipe, calling for ramen noodles! I like it a lot because you DON'T use the salt laden flavor packet, and it includes a lot of wonderful healthy ingredients like spinach and carrots. You could really mix this recipe up and use chicken, shrimp or even tofu. My kids liked it a lot too, BONUS!

I'll be submitting this to Reeni for Pasta Presto Nights!

Asian Beef and Noodle Bowl
Adapted From Better Homes and Gardens, 30 Minute Meals

Ingredients

4 cups water
2 packages ramen noodles
2 teaspoons chili oil, or any oil plus 1/8 teaspoon cayenne pepper (I didn't even bother with the heat)
12 oz beef flank steak or top round steak, trimmed and cut into bite sized strips
1 teaspoon grated fresh ginger
2 cloves chopped garlic
1 cup beef broth
2 tablespoons soy sauce
2 cups fresh torn spinach
1 cup shredded carrot
1/4 cup fresh cilantro

Directions

1. In a large saucepan bring the water to boiling. If desired, break up noodles, drop noodles into the boiling water. (Save or discard flavor packets). Return to boiling, boil for 2-3 minutes or until noodles are tender but still firm, stirring occasionally. Drain noodles, set aside.

2. Meanwhile, in a 12-inch skillet heat oil over medium-high heat. Add beef, ginger, and garlic; cook and stir for 2 to 3 minutes or until beef has reached desired doneness. Carefully stir beef broth and soy sauce into skillet. Bring to boiling; reduce heat.

3. Add spinach, carrot, cilantro, and cooked noodles, to skillet; stir to combine. Heat through.

Serves 4

Per Serving: 381 cal, 17g fat, 34mg chol, 2g fiber, 30g carbs

Points per Serving: 9

Bowties with Sausage and Roasted Peppers


During these dark days with no oven (long, drawn out sigh) I'm grateful for dinners that can all be done on the stove top like this. Granted, I'd have to use roasted peppers from a jar, but hey, these are tough, oven-less times we're living in.

It's kind of impossible to not like this meal, my kids happily chowed this down. Originally the recipe called for Orecchiette, but there was none to be found at the grocery store, so I found these itty bitty bowties instead, aren't they cute! To lighten it up a bit, I used turkey sausage, which in my mind is just as delicious. I also loved the fresh roasted peppers, they offer a bright and sweet addition to this savory meal. This recipe makes a lot, so when we pulled it out for leftovers, I tossed it in marinara to make it a bit different, and it was just as delicious. This is so great for a quick and easy weeknight meal, enjoy!


Bowties with Sausage and Roasted Peppers

Adapted by Great Food Fast by Martha Stewart

Ingredients


2 medium red bell peppers and 2 medium yellow bell peppers, four flat sides cut off core, ribs and seeds discarded
course salt and fresh ground pepper
1 lb orecchiette, small bowties or other short pasta (next time I would use about 3/4 lb)
2 teaspoons olive oil
1 lb sweet Italian sausage, removed from casings
1 tablespoon butter, cut into small pieces
1/3 cup grated Parmesan cheese

Directions

1. Heat the broiler. Place the peppers, skin side up, on a fol-lined baking sheet; broil 4 inches from the heat until charred, 18-20 minutes. Transfer to a large bowl. Cover with plastic wrap; steam for 2 to 3 minutes. Using a paper towel, rub off the pepper skins, reserving any juices in the bowl. thinly slice the peppers crosswise into 1/4 inch strips; return to bowl. Set aside.

2. In a large pot of boiling salted water, cook the pasta until al dente according to the package instructions. Drain, reserving 1/2 cup of the pasta water.

3. Meanwhile, heat the oil in a large skillet over medium heat. Cook the sausage, breaking it up with a spoon, until browned, 7 to 10 minutes. Add the roasted peppers; cook until heated through.

4. Transfer the sausage mixture to a large bowl; add the pasta, butter, reserved pasta water, and Parmesan. Season with salt and pepper. Toss to combine.

Hot Artichoke and Spinach Dip


I LOVE the holidays!! I love the gatherings, the parties, the music, the lights, even the chill in the air and the occasional snow storm. It is, without a doubt, my favorite time of year. And of course, having the love for food that I do doesn't hurt either. The holidays basically hand you a license to go hog-wild in the kitchen, and it's okay! It's the holidays! It would practically be wrong not to.


This is a dip I served for Thanksgiving, which in our house isn't so much an event, as it is a kick-off, to all of the gorging that will happen for the next month. And now that I've made this dip, I can guarantee that it's going to be making a gooey, cheesy appearance often in our household. This is an Alton Brown recipe, which not only has five stars from a million reviews, but it also takes literally two minutes to make. There is no baking, sauteing, or cooking of any kind. Just a quick mix, and into the warmer (crockpot) it goes, providing giddy flavorful love for all in attendance. Make this dip, use carrots, cracker, bread, a spoon, legos, whatever your heart fancies to dip it in. It will all be delicious!


Hot Spinach and Artichoke Dip
Adapted from Alton Brown

Ingredients

1 cup thawed, chopped frozen spinach
1 1/2 cups canned or jarred artichoke hearts
6 ounces cream cheese
1/4 cup sour cream
1/4 cup mayonnaise
1/3 cup grated Parmesan
1/2 teaspoon red pepper flakes
1/4 teaspoon salt
1/4 teaspoon garlic powder

Directions

Heat cream cheese in microwave for 1 minute or until hot and soft. Stir in rest of ingredients and serve hot. Keep in crockpot if you plan to party all night long.

Roasted Butternut Squash


This is actually the first year I've even tried cooking any type of winter squash, and now that I have, where has it been all my life!? It's so simple, delicious and healthy. This is an incredibly simple recipe that didn't require rocket science to come up with, but I wanted to post it for those of you that have never tried butternut squash, go try it!
Ingredients
1 butternut squash, peeled, seeded and chopped into uniform pieces
2 TB low calorie butter
1/3 cup brown sugar (or Splenda sub)
1/2 tsp salt
1/2 tsp pepper
Directions
Combine squash and butter and toss until butter coats squash evenly. Add sugar, salt and pepper and toss to coat. Arrange evenly on a cookie sheet. Bake at 375 for 15-25 minutes, or until fork tender. Remove from oven and immediately toss squash with spatula (otherwise the sugar sticks to the pan and gets really hard). Enjoy, it's as good as candy!

Vegetable Beef Noodle Soup


This is it, the final day before the biggest dinner of the year! Is everyone ready? Are we? NOOO! Fortunately our dinner is being split amongst three families, so at least I'm not procrastinating the entire dinner! Truth be told, we were about to head to Costco for some last minute shopping, but my poor little girl is suffering from a pretty bad stomach ache. I'm hoping she feels better soon, especially for tomorrow!

This is a recipe I found on Pam's site, For the Love of Cooking. I know you've been to her page, it's fantastic! I pretty much want to make every recipe she posts. This soup was a real crowd pleaser and definitely something that I'll be making often. It's hearty and healthy, with fantastic flavor. The recipe instructs you to cook it in the oven, but I cooked it on the stove top for quite a few hours and it was fantastic. Give it a try!

Have a wonderful Thanksgiving friends! I'll be looking forward to hearing how your holiday was!

Teresa

Corn Fritters with Roasted Tomatoes and Lime Aioli


Can you believe that Thanksgiving is less than two weeks away?! It's so hard to believe how fast this month has been going. I am starting to look forward to my turkey and mashed potatoes!

I made this a few months ago as a summer dish, but I also think it would serve as a pretty great appetizer for you Thanksgiving spread. The corn fritters are savory with a hint of sweetness, and paired with the roasted tomatoes, prosciutto and aioli, it's a dynamite combo. And if you're not up for adding another dish to Thanksgiving, it can stand pretty well on it's own, we actually enjoyed these for dinner. Enjoy and happy Wednesday!


Corn Fritters with Roasted Tomatoes and Lime Aioli

By Cooking Light

Ingredients

4 ripe tomatoes, halved (about 1 pound)
2 teaspoons olive oil, divided
1/2 teaspoon black pepper, divided
2.25 ounces all-purpose flour (about 1/2 cup)
1 teaspoon baking powder
1/3 cup fat-free milk
1 egg, beaten
1 1/2 cups fresh corn kernels (3 ears)
1/3 cup finely chopped green onions
1/4 teaspoon salt
3 tablespoons reduced-fat mayonnaise
2 tablespoons fresh lime juice
1/2 garlic clove, minced
1 teaspoon cold water
4 cups loosely packed arugula
4 (1/4-ounce) slices prosciutto

Directions

1. Preheat oven to 375°.

2. Arrange tomato halves, cut side up, on a baking sheet. Drizzle tomatoes with 1 teaspoon oil; sprinkle with 1/4 teaspoon pepper. Bake at 375° for 1 hour and 30 minutes or until tomatoes are soft and have lost a lot of their moisture.

3. Weigh or lightly spoon flour into a dry measuring cup; level with a knife. Combine flour and baking powder in a medium bowl. Add milk and egg; stir until smooth. Stir in remaining 1/4 teaspoon pepper, corn, green onions, and salt.

4. Heat 1/2 teaspoon oil in a large nonstick skillet over medium heat. Drop batter by level tablespoonfuls into pan to make 6 fritters; cook 2 minutes or until tops are covered with bubbles and edges are golden. Carefully turn fritters over; cook 2 minutes or until golden. Repeat procedure with remaining 1/2 teaspoon oil and remaining batter.

5. Combine mayonnaise, juice, garlic, and water. Place 1 fritter on each of 4 plates. Top each with 1 tomato half and 1/2 cup arugula. Repeat layers with remaining fritters, tomato halves, and arugula, ending with fritters. Top each serving with 1 prosciutto slice; drizzle with 4 teaspoons aioli.

Who says veggies can't be comforting?


Apparently I am a big fan of oven roasting, because this is also my favorite way to prepare vegetables. The come out so soft, so sweet, and caramelized. I LOVE them, and there are so many ways to prepare them. So here are my veggie oven roasting tips:


1. You can really roast just about any type of vegetable, even tomatoes (with garlic and basil, mmmm), but just be sure to combine veggies with the same firmness and that would combine well with each other. Root veggies, squash, peppers, mushrooms, and eggplant are some of my favorites.
2. Be sure to cut up all your veggies the same size so they all cook evenly.
3. Toss with olive oil, or butter, and favorite seasonings, even just salt and pepper will do. Rosemary, garlic and herbs, italian seasonings, pesto, even seasonings meant for meat.
4. Spread evenly over baking sheet and roast at 400 for 15-20 minutes, or until softened and browned. Time will often depend on the size you cut your veggies.
5. Eat them as a side dish, put in a sandwich or wrap with pesto, hummus or just mayo, you won't even miss your lunchmeat!


Pesto Tomato Flatbread


A while back, Alissa from Spunky Girl Eats, posted about her grape pesto pizza. I had seen that recipe in Cooking Light, but quickly turned the page, freaked out at the idea of grapes on a pizza. But, after her rave reviews, I knew I had to try it. Holy cow, what an amazing pizza, so many flavors. Go check out her blog for the recipe!

But afterwards, I needed something to do with the leftover pesto and pizza crust. I remembered a flatbread of pesto and tomato that I had at a restaurant not too long ago and decided to duplicate that. I'd like to introduce you to my new favorite lunch! Is there anything not to like? Fresh tomatoes, rich pesto, gooey mozzarella, it's like a party in my mouth! It also takes about three minutes to put together. Go make yourself some, thank me later.

Pesto Tomato Flatbread

Ingredients

2 tablespoons cornmeal
1 can flatbread pizza dough
4-5 tablespoons pesto (if you're not using homemade, use the stuff that comes from the refrigerated section, it's just better)
4-5 roma or campari tomatoes, chopped
5-6 basil leaves, torn, or cut into ribbons
2 cloves of garlic, minced
3 tablespoons pecorino romano
1 cup mozzarella, shredded

Directions

Sprinkle cornmeal on baking sheet or pizza stone. Lay out pizza crust. Spread an even layer of pesto over crust. Evenly arrange tomatoes, basil, garlic, and cheeses. Bake at temperature given on pizza dough can and bake until cheese is melted and crust is browned, about 10 minutes.

Braised Chicken with Mushrooms and Oven Baked Polenta


I'd never tried polenta before and I've been wanting to make it for some time now. This was an oven baked polenta, so it was very easy to make, just throw it together in a pan, whisk halfway through baking, and add the rest of the ingredients for a perfectly creamy polenta. However, I'm just not sure if I'm completely sold yet. I liked the creaminess, I liked how it was the perfect blank palate to soak up the flavors of the chicken and mushroom sauce, but it was just missing something to me. A meatiness, if you will, it just tasted a little empty to me. So either I need to figure out a better way to make polenta, or I will just be serving this with mashed potatoes. Does anyone have any good polenta tips for me?

Now the chicken on the other hand? Fantastic, divine, juicy, flavorful. You just can't beat chicken thighs that are cooked with such flavorful ingredients like white wine, garlic and mushrooms. We gobbled this up, and went back for seconds! Whether you make this with the polenta or not, you've got to try the chicken!

Braised Chicken with Mushrooms and Oven Baked Polenta
By Great Food Fast

Ingredients

4-6 boneless chicken thighs (the recipe calls for breasts, but we like our thighs!)
course salt and fresh ground pepper
2 tablespoons olive oil
1 lb mushrooms wiped clean and sliced
4 garlic cloves, halved
1/2 dry white wine (optional)
1 3/4 cup chicken broth
2 tablespoons chopped fresh parsley, plus more for garnish
Oven Baked Polenta (recipe to follow)

Directions

1. Sprinkle the chicken breasts with 1/4 teaspoon each of salt and pepper. Heat 1 tablespoon of oil in a large skillet over high heat. Add the chicken; cook until lightly browned, 2-3 minutes per side. Transfer to a plate.

2. Add the remaining tablespoon oil to the hot skillet. Add the mushrooms, garlic and 1/4 teaspoon salt. Cover; cook over medium heat until the mushrooms release their juices, 2 to 3 minutes. Remove the lid. Cook over high heat, tossing occasionally, until the mushrooms are golden, 4 to 5 minutes.

3. Pour the wine, if using, into the skillet; cook, stirring, until evaporated, 1 minute. Add the stock and parsley; cook over medium-high heat until the mushrooms are tender and the liquid has reduced, 8 to 10 minutes.

4. Return the chicken to the skillet. Cover; simmer over low heat until the chicken is cooked through, 10 to 12 minutes. Serve the cutlets and polenta topped with the mushrooms and a drizzle of cooking liquid. Garnish with additional fresh parsley.

Oven Baked Polenta

Ingredients

3/4 cup cornmeal
course salt and ground pepper
1/4 cup milk
2 tablespoons butter
1 teaspoon fresh marjoram, or 1/4 teaspoon dried

Directions

1. Preheat the oven to 425F. In a lidded baking dish, whisk together 3 cups water, the cornmeal, 1 1/4 teaspoons salt, and 1/8 teaspoons pepper. Cover and bake for 30 minutes, stirring halfway through (the polenta will still seem very watery, and you'll want to throw it out and give up, but don't worry, it's supposed to look like that! lol)

2. Remove from the oven, and add the milk, butter and marjoram, and whisk briskly until smooth. Serve immediately.

Serves 4

Mushroom Quesadillas with Butternut Squash Salad


The second thing I was responsible for during our bloggy lunch was the salad. I wanted to make something really unique and fall appropriate, rather then just a green salad. I was really excited when I found this recipe from Ina Garten for a Roasted Butternut Squash Salad with Warm Cider Vinaigrette. It's always a gamble making something for the first time when you are serving company, but luckily this salad turned out to be downright amazing. It's served warm, with arugula that is just wilted and practically melts in your mouth. The slightly sweet vinaigrette with nutty pecorino romano and big chunks of rich butternut squash would easily stand as a meal on it's own. I LOVED this salad and can't wait to make it again!

Roasted Butternut Squash Salad with Warm Cider Vinaigrette
By Ina Garten

Ingredients

1 butternut squash peeled and diced
olive oil
1 tablespoon pure maple syrup (I did use pure, but honestly, I don't think it would make a different if you just used Mrs. Butterworth's too!)
Kosher salt and freshly ground pepper
3 tablespoons dried cranberries
3/4 cups apple cider or apple juice
2 tablespoons apple cider vinegar
2 tablespoons minced shallots
2 teaspoons Dijon mustard
4 ounces baby arugula, washed and dried
1/2 cup walnut halves, toasted (next time I'm using chopped walnuts, the halves are a bit big for my taste)
3/4 cup freshly grated Parmesan (I love using Pecorino Romano as a substitute)

Directions

1. Preheat the oven to 400 degrees F.

2. Place the butternut squash on a sheet pan. Add 2 tablespoons olive oil, the maple syrup, 1 teaspoon salt and 1/2 teaspoon pepper and toss. Roast the squash for 15 to 20 minutes, turning once, until tender. Add the cranberries to the pan for the last 5 minutes.

3. While the squash is roasting, combine the apple cider, vinegar, and shallots in a small saucepan and bring to a boil over medium-high heat. Cook for 6 to 8 minutes, until the cider is reduced to about 1/4 cup. Off the heat, whisk in the mustard, 1/2 cup olive oil, 1 teaspoon salt, and 1/2 teaspoon of pepper.

4. Place the arugula in a large salad bowl and add the roasted squash mixture, the walnuts, and the grated Parmesan. Spoon just enough vinaigrette over the salad to moisten and toss well. Sprinkle with salt and pepper and serve immediately.


Alissa was in charge of our main course which were these amazing Mushroom Quesadillas. Apparently this was a recipe that Oprah had posted because it is what Jennifer Aniston had served at a lunch party, girlfriend's got good taste, that's all I have to say! These quesadillas are SO good and packed with tons of flavor. The cooking technique was really unique too. She cooked them in a skillet that was covered with a layer of Kosher salt to crisp the tortilla, which turned out so crisp and delicious. Alissa also used the Artisan Blend of Mexican cheeses and just the smell alone of this package of cheese had us drooling! Awesome quesadillas!

Mushroom Quesadillas on Whole Wheat Tortillas
Recipe adapted from The Family Chef, found on the O website

Ingredients

2 Tbsp. olive oil
8 ounces assorted mushrooms , thinly sliced
1 sprig thyme
Kosher salt and freshly ground pepper
4 whole wheat tortillas
4 ounces assorted cheeses (such as cotija, Jack, and ranchero), crumbled or grated
3 cups baby spinach
Cilantro leaves , for garnish (optional)

Directions

1. Heat olive oil in a large skillet over medium-high heat. Add mushrooms and thyme; cook, stirring occasionally, until crispy and golden, 6 to 8 minutes. Season with salt and pepper to taste.

2. Heat another skillet on medium-high heat. Sprinkle a little salt in the pan (it must be kosher or another coarse salt), and put one tortilla on top—the salt will keep the tortilla from sticking and help it crisp up without using any oil.

3. Place about 1/4 of cheese, spinach, and mushrooms on half of tortilla.

4. Fold second half of tortilla over to cover filling, and cook until bottom is golden and slightly crispy, 2 minutes. Flip tortilla over and continue cooking until other side is crisp and cheese is melted, 2 minutes more. Repeat process with remaining tortillas. Cut each in half or leave whole. Serve warm, garnished with cilantro leaves.


Be sure to check out Sara in the Kitchen for her amazing S'mores Cake!

Garden Risotto


This is really something that I should be posting in the spring. With it's gorgeous green asparagus, spinach and peas, it's the perfect way to celebrate the end of winter. However, since it's just too good to wait until spring, I'll give it to you now, and perhaps it will give you some "spring vibes" during those cold, snowy months!

Surprisingly enough, this was actually my first encounter with risotto, and I finally know why it's so popular! The flavor was so rich, and the rice is so naturally creamy. Risotto takes some attention and time, but it's not difficult at all. And the very best part is that it's a recipe by Ellie Krieger, which means it's not going to be mean to your waistline!

Garden Risotto
By Ellie Krieger

Ingredients

6 cups low-sodium chicken broth
2 teaspoons olive oil
1 medium onion, chopped
1 1/2 cups Arborio rice
1/2 cup dry white wine
3/4 teaspoon salt
Freshly ground black pepper
3 lightly packed cups baby spinach leaves
1 cup frozen peas
1/2 pound asparagus, steamed and cut into 3/4-inch pieces
1/4 cup freshly grated Parmesan

Directions

Bring the broth to a simmer in a medium saucepan. Heat the oil in a heavy saucepan over moderately low heat and cook the onion, stirring occasionally, until soft, 3 to 5 minutes. Add the rice and cook, stirring constantly, 1 minute. Add wine and simmer, stirring constantly, until absorbed, about 1 minute. Add 3/4 cup of the hot broth, the salt and a few grinds of fresh pepper and simmer, stirring constantly, until broth is absorbed. Continue simmering and adding hot broth, about 3/4 cup at a time, stirring constantly and allowing the broth to be absorbed before adding more, until rice is almost tender and creamy-looking, about 18 minutes.

Add the spinach and peas and cook until the spinach is wilted. Add the asparagus and cook just until the vegetables are hot. Stir in the Parmesan and more broth if the risotto seems too thick. Serve in soup plates.

Per Serving: 205 cal, 4g fat, 3.5g fiber

Serves 6

Points Per Serving: 4

A Nice Substitute for Coleslaw


Hey everyone! I'm just about back to normal. Glenn's parents have been here for the last few days and we have been having a lot of fun exploring PA. We've been checking out places like Hershey, Lancaster, and Longwood Gardens. It has been a lot of fun seeing them and hearing their stories of their last eighteen months on the Trinidad Islands where they have been living.

So, since I'm still entertaining guests, I thought I'd stop by with what our beloved Donna calls a quickie! I like coleslaw, but I don't love it. Too often it tastes soggy, gloppy and void of any nutritional value at all. So, while at my parents house, we thought we'd give this broccoli slaw a try. It comes preshredded, just like regular coleslaw, but it's shredded broccoli and cabbage, so it's much crisper, denser and full of a lot more vitamins. I made a light dressing, just enough to lightly coat the slaw, and then threw in some sliced almonds and cranberries. My mom said it was her favorite part of the meal, which she may just have said to make her daughter happy, but I'm pretty sure she meant it :-).

Broccoli Slaw


Ingredients
(the dressing ingredients are not specific, make it to your preferred taste)

1 bag broccoli slaw
1/2 cup low fat mayo
2 teaspoons vinegar (i used a seasoned rice vinegar)
1-2 tablespoons Splenda or sugar until sweetened to desired taste
salt and pepper
1/2 cup dried cranberries
1/2 cup almonds

Directions

Open bag of slaw and pour in bowl. In a separate bowl, combine mayo, vinegar, sweetener and salt and pepper. Adjust accordingly to taste. Pour dressing in with slaw, toss until coated evenly. Add almonds and cranberries. Enjoy!

Does life ever actually slow down? I remember saying things like "when it slows down in the summer..." and now I'm saying "when things slow down in the fall..." I'm beginning to think that things never actually slow down, they just change!

Panzanella with Balsamico Di Modena


About a month ago I took a trip to Peddler's Village PA. My sister and I had so much fun shopping their cute boutiques, enjoying the beautifully manicured grounds, and eating at their great local pub. I especially loved the several book stores and specialty food and cooking shops that they had there. I spent hours wondering, looking like a glazed over kid in a candy shop. One of the last shops I went to was a fantastic Italian shop called the Casa Casale, with an enthusiastic owner who quickly became my best friend. She let me sample all sorts of stuff, every one as delicious as the last. But then she let me sample this, and I was hooked.

There is a very long and interesting process in making the Balsamic Di Modena, which is a lovely balsamic vinegar. Long story short, it takes at least five years to age, switching from barrel to barrel all made of different woods. It's also incorporated with grapes, figs, juniper berries, cherries, mulberries and a bunch of other good stuff. The finished product is thick like a syrup, and delightfully sweet, along with the rich tanginess of vinegar. I sampled it, giggled like a little girl and immediately bought it. This is one of those products that does not need much at all to compliment it. In fact, you are practically looking for any vehicle you find to prevent yourself from simply drinking it straight from the bottle. It's so delicious on strawberries and melon, it does something completely different to the fruit. If using it on salads, it's recommended to not even mix in oil, or any other ingredient for that matter.

A beautiful product like this calls for beautiful fresh ingredients. I thought panzanella would be perfect, and another first for me. Panzanella is a really simple salad that is usually made of stale bread and tomatoes. I also added chopped red onions, cucumbers, fresh basil and halved bocconcini (small fresh mozzarella balls). Tossed it with a small amount of the vinegar and kosher salt, and you have sheer loveliness on a plate. I love the sweetness of the Balsamic Di Modena, but it would also be very delicious with any viniagrette. It's a light and healthy salad with a ton of flavor.

Harvest Spaghetti


Hello my friends! I'm back...kind of. We are home from vacation, and while it was such a good time, it's also very nice being home. Now we have one more visit from Glenn's parents, and then I am going to be spending the month of September hibernating like a bear!

I missed you all and your mouthwatering creations. I am going to be doing my best in the next few days getting caught up, and I really look forward to seeing what you've all been up to!

My mom and I had so much fun getting in the kitchen together and putting together some delicious meals. Okay, I'm going to be honest, she did most of the cooking, while I tasted, learned and marveled. That woman can cook! This, however, is a dish we made together and we both enjoy so much. It's a spaghetti dish packed with tons of veggies and whole wheat noodles. It's satisfying, rich, and oh so good for you. It's a good thing too, because the majority of the trip was spent eating things that, well, were not!

Harvest Spaghetti

Ingredients

1 onion, chopped finely
3 cloves garlic, minced
1 green pepper, chopped
1/2 zucchini, either grated, or diced finely
1/2 yellow summer squash, grated, or chopped finely
1 cup white or cremini mushrooms, chopped
1/2 can olives, chopped
1 pound lean ground beef, turkey, or sausage, cooked and drained
fresh basil, torn
1-2 tablespoons Italian Seasoning
1 teaspoon fennel seeds
1 14 oz can tomato sauce
1 14 oz can diced tomatoes
salt and pepper to taste

1 medium sized box whole wheat spaghetti, cooked and drained

grated Parmesan cheese

Directions

Heat olive oil in a large skillet. Saute onions, garlic and green peppers for 2-3 minutes, until they begin to soften. Add zucchini, squash and mushrooms, cook until vegetables are soft. Add olives, beef, Italian seasonings, and fennel, stir until combined. Add tomato sauce, diced tomatoes, and salt and pepper. Simmer for 10-20 minutes, or until sauce reduces and thickens to desired consistency (I like mine nice and thick).

Pour sauce over individual helpings of spaghetti noodles and top with Parmesan cheese. Enjoy!

Baked Potato Soup


Sometimes I don't think that the potato gets the credit it deserves. Sure, it's a homely root that grows all over the country, but they're also delicious, velvety and filling. i love their versatility, and I'm convinced that, if needed, we could feel the world with potatoes. I remember growing up we had "potato bars" which was basically a baked potato drowning in as many sides as possible, chili, cheese, beef, sour cream, broccoli, chives, onions, and if mom was in a good mood, Fritos. Insanely satisfying, great for kids and very inexpensive. Ah, the great potato.


When I found this recipe I realized how long it had been since I'd cooked with a tater and quickly got busy. I love this recipe because, since the potato is already dense with a lovely texture, you really don't need to add much to the soup for it to be rich. We piled this with bacon, cheese, and chives and ate like kings, for cheap!


Baked Potato Soup

From Skinnytaste


Ingredients


2 russet potatoes, washed and dried

1 small head of cauliflower, stem removed cut into florets

1 1/2 cups fat free chicken broth

1 1/2 cups 1% reduced-fat milk

salt and freshly cracked black pepper

1/2 cup light sour cream

10 tbsp reduced-fat shredded sharp cheddar cheese

6 tbsp chopped chives, divided

3 slices bacon, cooked and crumbled (you can use turkey bacon if you prefer)


Directions


Pierce potatoes with a fork; microwave on high for 5 minutes turn over and microwave another 3 - 5 minutes, until tender. Or if you prefer to use your oven, bake at 400° for 1 hour or until tender. Cool. Peel potatoes.


Meanwhile, steam cauliflower with water in a large covered pot until tender. Drain and return to pot. On medium heat, add chicken broth, milk, potatoes and bring to a boil. Use an immersion blender to puree until smooth. Add sour cream, half the chives, salt and pepper and cook on low another 5-10 minutes, stirring occasionally.


Remove from heat. Ladle 1 cup soup into each bowl. Top each serving with 2 tbsp cheese, remaining chives, and bacon.

Info recommended by: Cooking and Cooking every day | Sponsored by: Cooking articles, Free cooking and Cooking today